Intro
The first post covered the first two parts of this series, the basics of what a servlet is and three "flavors" of servlet classes. This post begins with how to implement a servlet so that they're actually accessable via an end point.
ServletFactory
A factory is, in OOP, an object for creating other objects. In order for these servlets to be "registered" with the application to be end point accessible, they need to be provided by a ServletFactory; specifically, one that implements com.ibm.designer.runtime.domino.adapter.IServletFactory. This will register an end point via a pair of Maps which match, via a key, the package.class name to the end point name. This makes the servlet accessible via <your NSF>/xsp/<end-point-name>.
A Note on IServletFactory
In one of the more counterintuitive things I've run into since starting Domino/XPages development, the IServletFactory package is fully there on the server and usable, but the lwpd.domino.adapter.jar needs to be added as an external JAR to the build path in Designer. Sven Hasselbach has done an excellent job of showing how to do this in his blog post on the subject. Sven's blog is a great read with some very applicable posts on REST security, including CORS topics and more; I highly recommend reading his blog, if you don't already.
Marrying the ServletFactory to the Application
Marriage, The Short, Short Version
Your ServletFactory needs one last step to be registered as usable by your application. Here's the short, short version.
After adding your "external JAR" to your build path, you need to create a file called com.ibm.xsp.adapter.servletFactory. Create that file in
The Less-Short Version
The file we'll created needs to be in the project bulid path. In Domino 9 (and late 8.5.3 versions, anything in which there came a Code/Java and Code/JARs design section in the Application perspective), we should focus on the Code/Java section. For older versions, the classic location tends to be WebContent/src; the bottom line is: it must be a part of your build path. To create the file, it's best to switch views to Package Explorer.
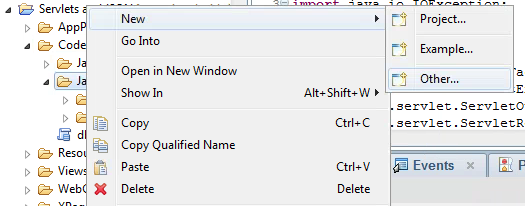
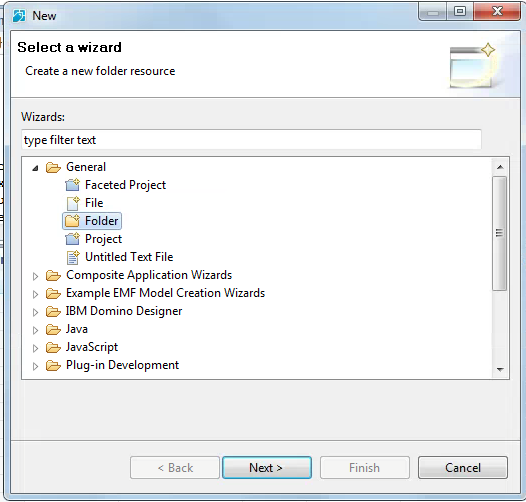
You'll need to right-click on your Code/Java folder and select New, followed by Other. Select folder and create one called META-INF/services/ (it'll nest the second one).
Then do the same, selecting file, and call it com.ibm.xsp.adapter.servletFactory. In this file, we put a single line for the class which will do the assigning of end points to servlet Classes.
com.eric.test.ServletFactory
Registering Your Servlet Classes
Now that we finally have our adapter.servletFactory file pointing at our ServletFactory Class, we can start adding them into the ServletFactory. Here's one I prepared earlier.
package com.hello.factory;

import java.util.HashMap;
import java.util.Iterator;
import java.util.Map;

import javax.servlet.Servlet;
import javax.servlet.ServletException;

import com.ibm.designer.runtime.domino.adapter.ComponentModule;
import com.ibm.designer.runtime.domino.adapter.IServletFactory;
import com.ibm.designer.runtime.domino.adapter.ServletMatch;

/**
 * The factory (a provider) implements IServletFactory and creates
 * two maps, for key to package.class and key to servletname matching.
 */
public class ServletFactory implements IServletFactory {
    private static final Map<String, String> servletClasses = new HashMap<String, String>();
    private static final Map<String, String> servletNames = new HashMap<String, String>();
    private ComponentModule module;

    /**
     *  init adds the classes and servlet names, mapping to the same key.
     */
    public void init(ComponentModule module) {

        servletClasses.put("exhttpservlet", "com.hello.servlets.ExampleHttpServlet");
        servletNames.put("exhttpservlet", "Example HttpServlet");

        servletClasses.put("exdesignerfacesservlet", "com.hello.servlets.ExampleDesignerFacesServlet");
        servletNames.put("exdesignerfacesservlet", "Example DesignerFaces Servlet");

        servletClasses.put("exabstractservlet", "com.hello.servlets.ExampleAbstractedServlet");
        servletNames.put("exabstractservlet", "Example AbstractXSP Servlet");

        this.module = module;
    }

    /**
     * The ServletMatch matches the path to the correctly identified servlet;
     * by the routed key.
     */
    public ServletMatch getServletMatch(String contextPath, String path)
            throws ServletException {
        try {
            String servletPath = "";
            // iterate the servletNames map
            Iterator<Map.Entry<String, String>> it = servletNames.entrySet().iterator();
            while (it.hasNext()) {
                Map.Entry<String, String> pairs = it.next();
                if (path.contains("/" + pairs.getKey())) {
                    String pathInfo = path;
                    return new ServletMatch(getWidgetServlet(pairs.getKey()),
                            servletPath, pathInfo);
                }
            }
        } catch (Exception e) {
            e.printStackTrace();
        }
        return null;
    }

    public Servlet getWidgetServlet(String key) throws ServletException {
        return module.createServlet(servletClasses.get(key), servletNames
                .get(key), null);
    }
}
Aside from a bit of voodoo, this should show how we can map our end point names to the class names and proper names, respectively. As you can see, I mapped each of my example servlets (HttpServlet, DesignerFacesServlet, and AbstractXSPServlet) from the last post into respective endpoint names/keys. The table below shows the resulting mapping of the endpoint (after the server/path/NSF/).
| Servlet Endpoint | Servlet Class | Name |
|---|---|---|
| /xsp/exhttpservlet | com.hello.servlets.ExampleHttpServlet | Example HttpServlet |
| /xsp/exdesignerfacesservlet | com.hello.servlets.ExampleDesignerFacesServlet | Example DesignerFacesServlet |
| /xsp/exabstractservlet | com.hello.servlets.ExampleAbstractedServlet | Example AbstractXSPServlet |
Summary
Now we have a servlet and it's fully registered with the application and accessible via an HTTP endpoint. The next post will get into what we do with these servlets.

